Want Database to Upload to Blob Storage
This browser is no longer supported.
Upgrade to Microsoft Edge to take advantage of the latest features, security updates, and technical support.
Tutorial: Upload and analyze a file with Azure Functions and Blob Storage
In this tutorial, you'll learn how to upload an image to Azure Blob Storage and process it using Azure Functions and Computer Vision. Yous'll also learn how to implement Azure Office triggers and bindings as office of this procedure. Together, these services will analyze an uploaded image that contains text, extract the text out of it, and then shop the text in a database row for later analysis or other purposes.
Azure Blob Storage is Microsoft's massively scalable object storage solution for the deject. Hulk Storage is designed for storing images and documents, streaming media files, managing fill-in and archive data, and much more. Yous can read more nigh Blob Storage on the overview folio.
Azure Functions is a serverless computer solution that allows you to write and run small blocks of code as highly scalable, serverless, event driven functions. You tin can read more than about Azure Functions on the overview folio.
In this tutorial, y'all will larn how to:
- Upload images and files to Blob Storage
- Use an Azure Function effect trigger to process information uploaded to Blob Storage
- Employ Cognitive Services to analyze an image
- Write data to Table Storage using Azure Function output bindings
Prerequisites
- An Azure account with an active subscription. Create an account for complimentary.
- Visual Studio 2022 installed.
Create the storage account and container
The first footstep is to create the storage account that will concord the uploaded blob data, which in this scenario volition be images that contain text. A storage account offers several different services, but this tutorial utilizes Blob Storage and Table Storage.
- Azure portal
- Azure CLI
Sign in to the Azure portal.
-
In the search bar at the top of the portal, search for Storage and select the outcome labeled Storage accounts.
-
On the Storage accounts page, select + Create in the summit left.
-
On the Create a storage account page, enter the post-obit values:
- Subscription: Choose your desired subscription.
- Resource Group: Select Create new and enter a name of
msdocs-storage-office, and then cull OK. - Storage account proper noun: Enter a value of
msdocsstoragefunction. The Storage business relationship name must be unique across Azure, so you may need to add together numbers after the name, such every bitmsdocsstoragefunction123. - Region: Select the region that is closest to y'all.
- Performance: Choose Standard.
- Redundancy: Leave the default value selected.
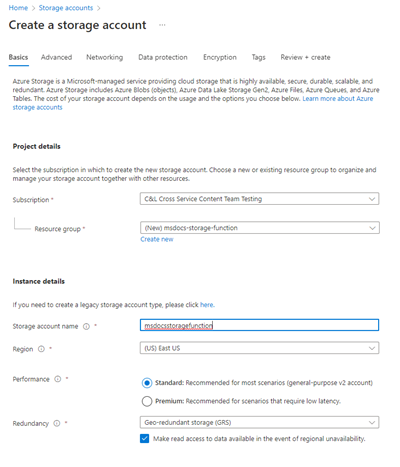
- Select Review + Create at the bottom and Azure will validate the information you entered. One time the settings are validated, choose Create and Azure will brainstorm provisioning the storage account, which might accept a moment.
Create the container
-
After the storage business relationship is provisioned, select Get to Resource. The next footstep is to create a storage container inside of the account to hold uploaded images for analysis.
-
On the navigation panel, choose Containers.
-
On the Containers page, select + Container at the top. In the slide out panel, enter a Proper name of imageanalysis, and make certain the Public access level is set to Blob (anonymous read access for blobs merely. Then select Create.
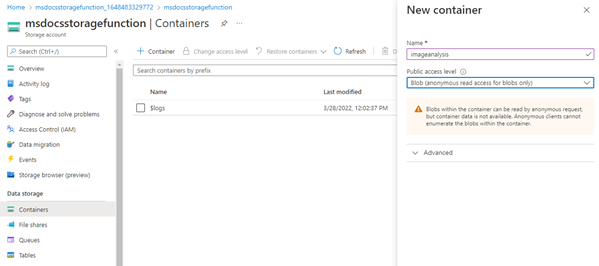
You should encounter your new container appear in the list of containers.
Recall the connection string
The last step is to retrieve our connectedness string for the storage business relationship.
-
On the left navigation panel, select Admission Keys.
-
On the Admission Keys page, select Bear witness keys. Copy the value of the Connectedness Cord under the key1 department and paste this somewhere to use for after. Y'all'll also want to make a notation of the storage account name
msdocsstoragefunctionfor later too.
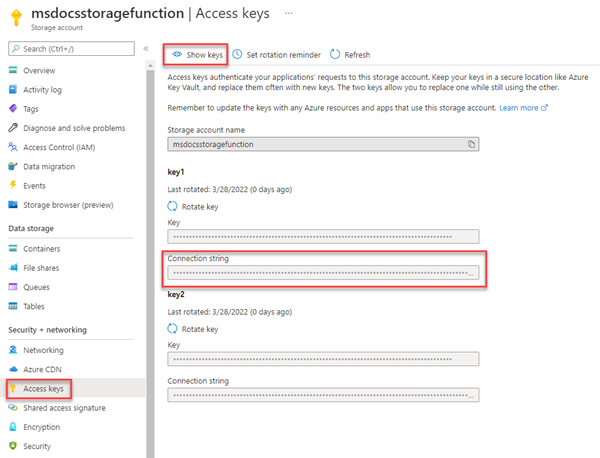
These values will be necessary when we demand to connect our Azure Function to this storage account.
Create the Computer Vision service
Side by side, create the Computer Vision service account that will process our uploaded files. Estimator Vision is function of Azure Cognitive Services and offers a variety of features for extracting information out of images. You can learn more virtually Computer Vision on the overview page.
- Azure portal
- Azure CLI
-
In the search bar at the top of the portal, search for Figurer and select the event labeled Calculator vision.
-
On the Reckoner vision page, select + Create.
-
On the Create Computer Vision page, enter the post-obit values:
- Subscription: Cull your desired Subscription.
- Resource Group: Use the
msdocs-storage-functionresource group you created earlier. - Region: Select the region that is closest to you.
- Name: Enter in a name of
msdocscomputervision. - Pricing Tier: Choose Costless if it is available, otherwise choose Standard S1.
- Check the Responsible AI Detect box if you lot concur to the terms

-
Select Review + Create at the lesser. Azure will take a moment validate the information yous entered. In one case the settings are validated, choose Create and Azure will begin provisioning the Calculator Vision service, which might take a moment.
-
When the operation has completed, select Get to Resource.
Retrieve the keys
Next, we demand to notice the hugger-mugger key and endpoint URL for the Reckoner Vision service to use in our Azure Office app.
-
On the Figurer Vision overview folio, select Keys and Endpoint.
-
On the Keys and EndPoint page, copy the Key ane value and the EndPoint values and paste them somewhere to use for later.

Download and configure the sample projection
The code for the Azure Function used in this tutorial can be plant in this GitHub repository. You can also clone the project using the command beneath.
git clone https://github.com/Azure-Samples/msdocs-storage-bind-function-service.git \ cd msdocs-storage-demark-function-service/dotnet The sample project lawmaking accomplishes the following tasks:
- Retrieves environment variables to connect to the storage account and Computer Vision service
- Accepts the uploaded file equally a blob parameter
- Analyzes the blob using the Estimator Vision service
- Sends the analyzed image text to a new table row using output bindings
Once you take downloaded and opened the project, there are a few essential concepts to empathize in the main Run method shown below. The Azure function utilizes Trigger and Output bindings, which are applied using attributes on the Run method signature.
The Table attribute uses 2 parameters. The start parameter specifies the proper name of the table to write the parsed image text value returned by the function. The second Connection parameter pulls a Table Storage connexion string from the environs variables so that our Azure part has access to information technology.
The BlobTrigger attribute is used to bind our function to the upload event in Blob Storage, and supplies that uploaded blob to the Run function. The hulk trigger has two parameters of its ain - one for the name of the blob container to monitor for uploads, and one for the connection cord of our storage business relationship over again.
// Azure Role proper name and output Bounden to Table Storage [FunctionName("ProcessImageUpload")] [return: Table("ImageText", Connection = "StorageConnection")] // Trigger bounden runs when an image is uploaded to the blob container below public async Task<ImageContent> Run([BlobTrigger("imageanalysis/{proper name}", Connexion = "StorageConnection")]Stream myBlob, string proper name, ILogger log) { // Get connection configurations string subscriptionKey = Environment.GetEnvironmentVariable("ComputerVisionKey"); string endpoint = Surroundings.GetEnvironmentVariable("ComputerVisionEndpoint"); string imgUrl = $"https://{ Environment.GetEnvironmentVariable("StorageAccountName")} .blob.core.windows.cyberspace/imageanalysis/{name}"; ComputerVisionClient client = new ComputerVisionClient( new ApiKeyServiceClientCredentials(subscriptionKey)) { Endpoint = endpoint }; // Go the analyzed image contents var textContext = expect AnalyzeImageContent(customer, imgUrl); render new ImageContent { PartitionKey = "Images", RowKey = Guid.NewGuid().ToString(), Text = textContext }; } public form ImageContent { public string PartitionKey { get; gear up; } public string RowKey { get; set; } public string Text { get; prepare; } } This code also retrieves essential configuration values from environs variables, such as the storage business relationship connection string and Computer Vision primal. We'll add these environs variables to our Azure Role environment after information technology's deployed.
The ProcessImage function also utilizes a second method called AnalyzeImage, seen below. This code uses the URL Endpoint and Key of our Figurer Vision account to make a request to that server to process our image. The request will return all of the text discovered in the image, which will and so exist written to Table Storage using the output binding on the Run method.
static async Task<cord> ReadFileUrl(ComputerVisionClient customer, cord urlFile) { // Analyze the file using Computer Vision Customer var textHeaders = await customer.ReadAsync(urlFile); string operationLocation = textHeaders.OperationLocation; Thread.Sleep(2000); // Complete lawmaking omitted for brevity, view in sample project render text.ToString(); } Running locally
If you lot'd similar to run the project locally, you tin can populate the environment variables using the local.settings.json file. Inside of this file, fill in the placeholder values with the values y'all saved before when creating the Azure resources.
Although the Azure Function code volition run locally, information technology will still connect to the live services out on Azure, rather than using any local emulators.
{ "IsEncrypted": imitation, "Values": { "AzureWebJobsStorage": "UseDevelopmentStorage=true", "FUNCTIONS_WORKER_RUNTIME": "dotnet", "StorageConnection": "your-storage-account-connection-cord", "StorageAccountName": "your-storage-account-proper noun", "ComputerVisionKey": "your-computer-vision-key", "ComputerVisionEndPoint": "your-calculator-vision-endpoint" } } Deploy the code to Azure Functions
You are now ready to deploy our application to Azure by using Visual Studio. You can also create the Azure Functions app in Azure at the same time as office of the deployment procedure.
-
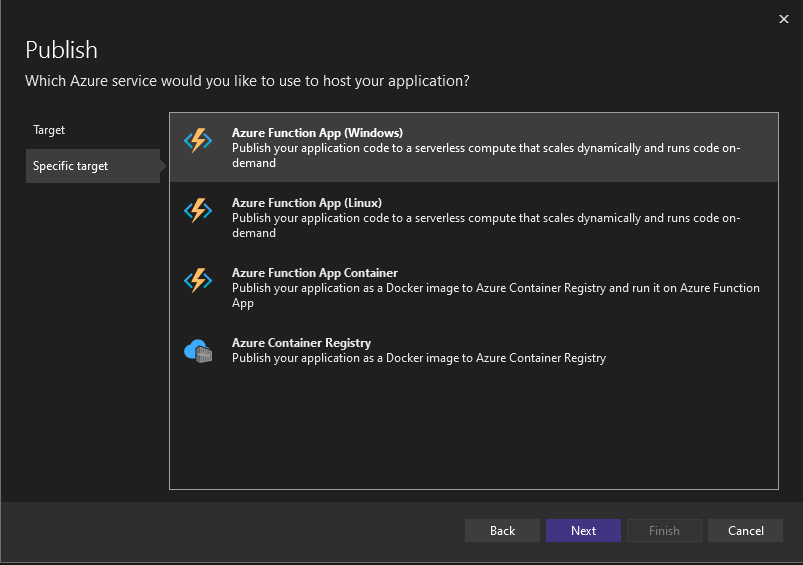
To begin, right select the ProcessImage project node and select Publish.
-
On the Publish dialog screen, select Azure and choose Next.

- Select Azure Office App (Windows) or Azure Function App (Linux) on the next screen, and and then choose Side by side once more.
-
On the Functions instance step, make sure to choose the subscription you lot'd similar to deploy to. Side by side, select the green + symbol on the correct side of the dialog.
-
A new dialog will open. Enter the following values for your new Function App.
- Name: Enter msdocsprocessimage or something similar.
- Subscription Proper name: Choose whatsoever subscription y'all'd similar to utilize.
- Resource Grouping: Choose the
msdocs-storage-functionresource group you created earlier. - Plan Type: Select Consumption.
- Location: Choose the region closest to you.
- Azure Storage: Select the storage account you created earlier.
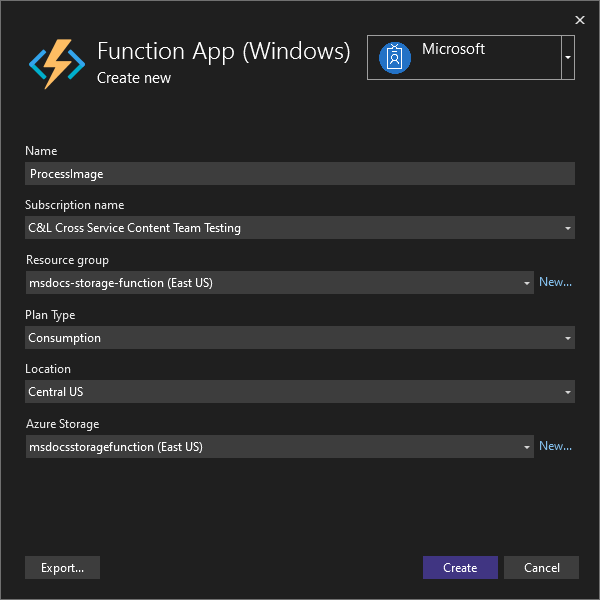
-
One time you have filled in all of those values, select Create. Visual Studio and Azure will begin provisioning the requested resources, which will have a few moments to complete.
-
Once the procedure has finished, select Finish to close out the dialog workflow.
-
The terminal step to deploy the Azure Function is to select Publish in the upper right of the screen. Publishing the function might also accept a few moments to consummate. Once it finishes, your application volition be running on Azure.
Connect the services
The Azure Role was deployed successfully, but it cannot connect to our storage account and Computer Vision services yet. The correct keys and connection strings must first be added to the configuration settings of the Azure Functions app.
-
At the top of the Azure portal, search for function and select Function App from the results.
-
On the Office App screen, select the Office App you lot created in Visual Studio.
-
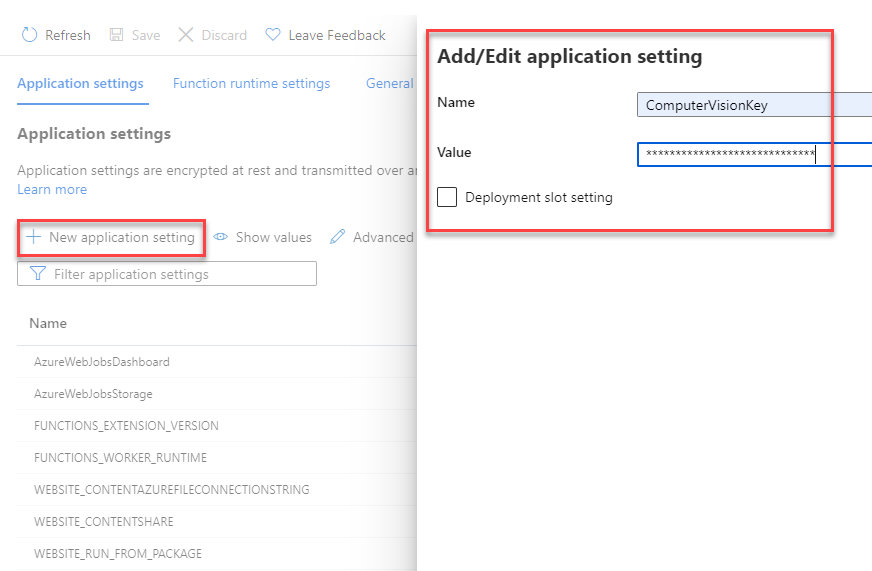
On the Function App overview page, select Configuration on the left navigation. This will open a page where we tin can manage various types of configuration settings for our app. For now, we are interested in Application Settings section.
-
The adjacent step is to add settings for our storage account proper noun and connection string, the Reckoner Vision underground key, and the Computer Vision endpoint.
-
On the Awarding settings tab, select + New application setting. In the flyout that appears, enter the post-obit values:
- Proper name: Enter a value of ComputerVisionKey.
- Value: Paste in the Computer Vision key y'all saved from before.
- Click OK to add together this setting to your app.
- Side by side, let'south echo this process for the endpoint of our Estimator Vision service, using the post-obit values:
- Name: Enter a value of ComputerVisionEndpoint.
- Value: Paste in the endpoint URL you saved from earlier.
- Repeat this step again for the storage account connection, using the following values:
- Proper name: Enter a value of StorageConnection.
- Value: Paste in the connexion string yous saved from earlier.
- Finally, echo this procedure one more time for the storage account name, using the following values:
- Name: Enter a value of StorageAccountName.
- Value: Enter in the proper name of the storage account yous created.
- After you have added these awarding settings, make sure to select Save at the elevation of the configuration page. When the save completes, you can hit Refresh likewise to brand sure the settings are picked upward.
All of the required environment variables to connect our Azure function to dissimilar services are now in place.
Upload an paradigm to Blob Storage
You lot are at present set to exam out our application! Yous tin upload a hulk to the container, and and so verify that the text in the paradigm was saved to Table Storage.
-
Get-go, at the top of the Azure portal, search for Storage and select storage business relationship. On the storage account page, select the account you created earlier.
-
Side by side, select Containers on the left nav, and then navigate into the ImageAnalysis container you created before. From hither y'all can upload a test epitome right inside the browser.

-
You can find a few sample images included in the images folder at the root of the downloadable sample project, or you can apply i of your ain.
-
At the top of the ImageAnalysis page, select Upload. In the flyout that opens, select the binder icon on the right to open up a file browser. Choose the image you'd like to upload, and then select Upload.
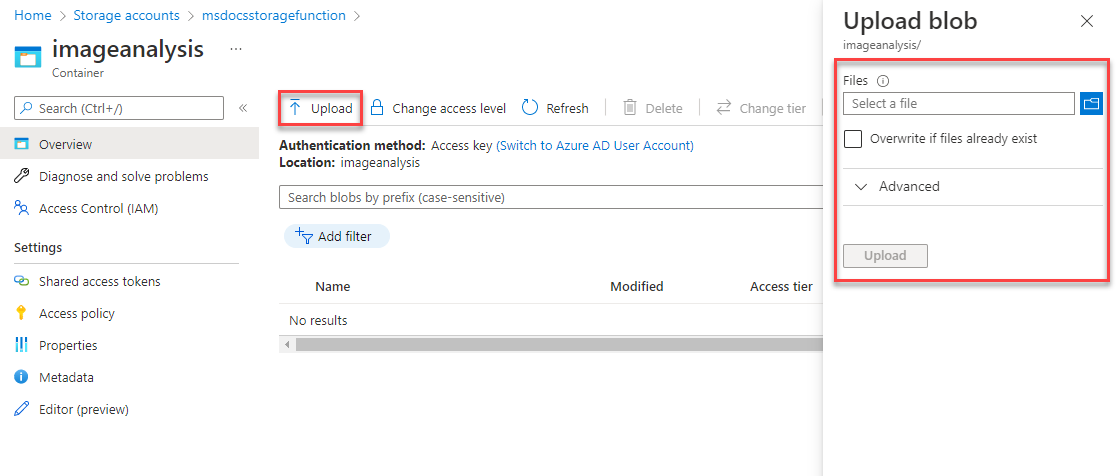
-
The file should announced within of your blob container. Next, yous can verify that the upload triggered the Azure Role, and that the text in the prototype was analyzed and saved to Table Storage properly.
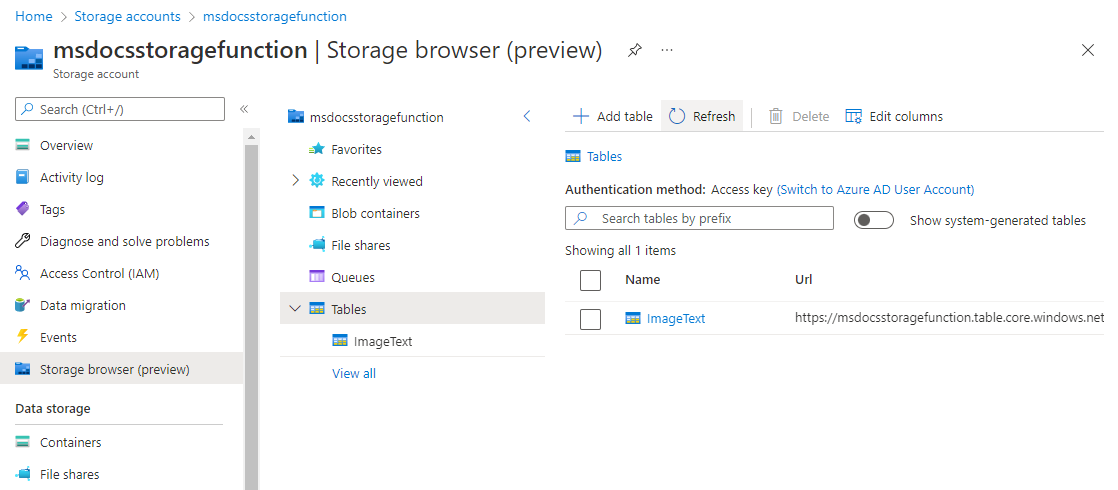
-
Using the breadcrumbs at the height of the page, navigate up one level in your storage account. Locate and select Storage browser on the left nav, and so select Tables.
-
An ImageText table should now exist available. Click on the tabular array to preview the information rows inside of it. Yous should see an entry for the candy epitome text of our upload. You can verify this using either the Timestamp, or past viewing the content of the Text column.
Congratulations! You succeeded in processing an prototype that was uploaded to Blob Storage using Azure Functions and Computer Vision.
Clean up resources
If y'all're not going to proceed to use this awarding, yous can delete the resources y'all created by removing the resource grouping.
- Select Resource groups from the chief navigation
- Select the
msdocs-storage-functionresource group from the list. - Select the Delete resource group button at the top of the resource group overview page.
- Enter the resources group name msdocs-storage-part in the confirmation dialog.
- Select delete. The process to delete the resource group may take a few minutes to complete.
Feedback
Submit and view feedback for
Source: https://docs.microsoft.com/en-us/azure/storage/blobs/storage-upload-process-images
0 Response to "Want Database to Upload to Blob Storage"
Post a Comment